Three steps. About a minute. Then your AI remembers.
Start free — no wallet, no card, nothing to bridge. Expected results at every step.
If you can paste a config block, you can finish this. Paid tiers are on the same key, by card, M-PESA or stablecoin — and you can decide that later.
Start free — no wallet, no card
You don’t need a wallet or a card to try SAIHM. Activate a free, one-time lifetime memory allowance from the command line. It prints a short code and a link: open the link, enter the code, and approve with your GitHub account.
npx -y @saihm/mcp-server-pro free-joinOr skip the command entirely — add SAIHM to your client as in Step 1 below and just tell your agent “Join SAIHM.” Self-join is on by default, so there is nothing to configure. It creates your sovereign memory key on this device and walks you through the same one-time GitHub sign-in. Back up the key file it names — it is the only key to your memory.
Starting from the web instead? /free signs you in with Google or Microsoft. Either way, the same key upgrades to a paid tier later — nothing is rebuilt.
Step 1 — Add SAIHM to your client
Add the memory server to your MCP client’s config. This is the whole install:
{
  "mcpServers": {
    "saihm": {
      "command": "npx",
      "args": ["-y", "@saihm/mcp-server-pro"]
    }
  }
}
On Claude Code, one line does the same thing:
claude mcp add saihm -- npx -y @saihm/mcp-server-proExpected result: after restarting your client, your agent lists SAIHM’s memory tools. Nothing is stored yet, and no payment method has been asked for.
Step 2 — Say “Join SAIHM”
Tell your agent, in plain language: “Join SAIHM.” It generates your memory key on this device and prints a short code with a link for a one-time GitHub sign-in, which confirms you are a unique person.
Expected result: your agent reports that it joined, and names the file holding your key. The key is created locally and is never transmitted — encryption and decryption happen in the client process, so the service stores ciphertext it cannot read. Back that file up.
Step 3 — Check that it remembered
Tell your agent something worth keeping — a preference, a project constraint, how you like your code reviewed. Then start a brand-new session and ask it what it remembers.
Expected result: the new session recalls what you told the old one. That is the whole point: the memory belongs to you rather than to a single chat window, and it follows you across clients, models and vendors.
Paying: card, M-PESA or PayPal
When you want a paid tier, the simplest route needs no wallet and no crypto. Everything below happens at /join, on the same key you already have — existing memories carry over.
- Card, worldwide — Stripe. Pay a monthly tier with any Stripe-supported card or wallet. Renews monthly, cancel any time.
- Card or M-PESA, Africa — Paystack. Pay in Kenyan shillings by card, or push a one-time M-PESA payment from your phone. An M-PESA payment buys one month outright rather than starting a subscription, so there is nothing to cancel later.
- PayPal. Also available at /join.
Current tiers and rates are on Pricing. A payment below your plan’s minimum is rejected rather than part-credited, so send at least the full amount.
Paying with USDC.e on COTI V2
If you would rather settle in stablecoin than by card, you can. This is entirely optional — the free path above and the card path need none of it. The full walkthrough follows, written for people who have not used a wallet before.
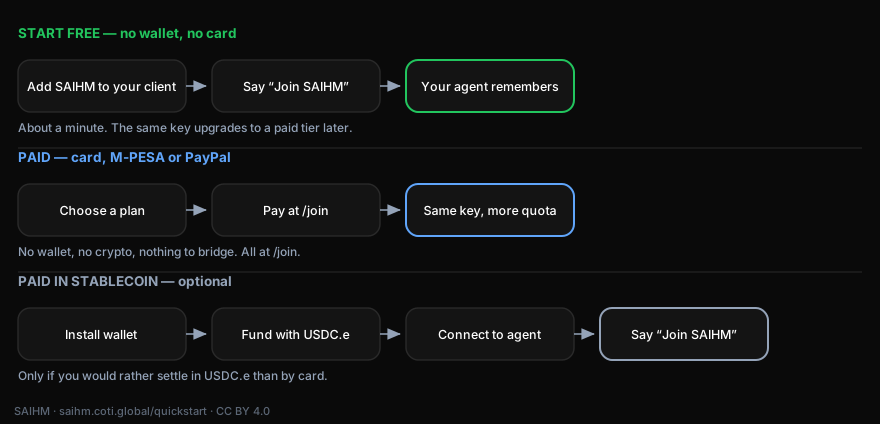
How the three paths compare
Most people should take the free path: add the client, say “Join SAIHM”, done in about a minute. (Starting from the web at /free instead? That path signs you in with Google or Microsoft.) When you want a paid tier, paying by card at /join needs no wallet at all. The stablecoin walkthrough below is for people who would rather settle in USDC.e — and every path upgrades the same key, so nothing is rebuilt if you start free today.
This diagram is CC BY 4.0 — reproduce or adapt it, commercially or otherwise, with attribution. Download the SVG; the license travels inside the file. Credit as: Three ways to start with SAIHM by SAIHM, CC BY 4.0.
What you’ll need for the wallet path
- A device (phone or desktop) with a modern browser.
- Stablecoin (USDC) on a chain you already use, or a COTI balance you’ve bought on an exchange — enough for the plan you want. The Free tier costs nothing. Paid plans have a minimum: Pro is $50 per month, and a payment below your plan’s minimum is rejected rather than part-credited, so send at least the full amount. Check Pricing before you fund.
- About 5 minutes.
Wallet step 1 — Install MetaMask, then add COTI V2 mainnet
- Install MetaMask from metamask.io/download. Set a password.
- Save your recovery phrase somewhere offline and safe. A piece of paper in a drawer is better than a screenshot. The recovery phrase is the only way to recover your wallet — and anyone with it can drain it.
- Add COTI V2 Helium mainnet as a custom network in MetaMask:
- Network name:
COTI V2 Helium mainnet - RPC URL:
https://mainnet.coti.io/rpc - Chain ID:
2632500 - Currency symbol:
COTI - Block explorer:
https://mainnet.cotiscan.io
- Network name:
Expected result: When you switch MetaMask to “COTI V2 Helium mainnet”, your balance shows 0 COTI. That is correct — you have not funded it yet. If MetaMask shows a different chain, you are still on Ethereum (or whatever the previous network was); use the network selector at the top.
Other wallet options: /appendix/wallets.
Wallet step 2 — Get USDC.e onto COTI V2
This is the only complicated step: bridge a stablecoin you already hold into USDC.e on COTI V2.
Bridge a stablecoin you already hold
- Open nexus.hyperlane.xyz in the same browser as MetaMask. (Note: bridge.coti.io only bridges COTI and gCOTI, not USDC. Use Hyperlane Nexus for USDC → USDC.e.)
- Connect MetaMask. Select Ethereum as the source chain (where your USDC currently sits).
- Pick “USDC” on the source side. The destination should be COTI V2 / USDC.e.
- Enter the amount. If this is your first bridge, send a small test amount — $5 to $10 — and confirm it arrives before sending more. Then bridge the rest, so the USDC.e balance that lands on COTI V2 covers your plan’s minimum (Pro: $50). You can bridge more than once, but you cannot part-pay a plan.
- Confirm the bridge transaction in MetaMask. You will pay source-chain gas (separate from the USDC amount) in the source chain’s native token (e.g., ETH on Ethereum, MATIC on Polygon).
Expected result: After the bridge confirms (typically a few minutes for major chains; longer for slower or congested chains), switch MetaMask to “COTI V2 Helium mainnet” and you should see USDC.e in your token list. If you do not see it, click MetaMask’s “Import token” option and paste the COTI V2 USDC.e contract address shown on the bridge’s confirmation screen. MetaMask does not auto-detect every token.
Wallet step 3 — Connect MetaMask to your AI agent
Most agents that support a wallet have a “Connect wallet” option in their settings or onboarding flow. Pick MetaMask. Approve the connection in MetaMask’s pop-up.
Expected result: Your agent now sees your wallet address (a public string like 0x…). It does not see your private key or recovery phrase. Connecting a wallet is read-only-by-default until you sign a transaction.
List of agents that support wallet-connect: /appendix/ai-agents.
Wallet step 4 — Say “Join SAIHM”
This is the stablecoin path, bound to the wallet you connected in wallet steps 1–3. If you already activated the free tier from the “Start free” card above, you’re already in — use this step only when you want to move up to a paid tier on that same key.
Tell your agent, in plain language, what tier you want. Examples:
- “Use SAIHM pay-as-you-go.” — settle per call at the current PAYG rates on pricing.
- “Join SAIHM on Pro, pay monthly in USDC.e.” — flat monthly rate (see pricing).
- “Join SAIHM on Pro Fast.” — for high-volume months (see pricing).
Your agent will prepare the payment and ask MetaMask to sign once. SAIHM covers the COTI gas on your behalf — you do not need to hold any COTI for this.
Expected result: A single MetaMask “sign” prompt for the tier you chose. Review the amount and the recipient, then approve. Within a few seconds your agent confirms enrollment and you can start telling it things to remember.
Wallet step 5 — Verify on the public chain (optional)
You can confirm independently of your agent that the enrollment really happened on-chain:
- Open public block explorer.
- Paste your wallet address into the search bar.
- Look at “Recent transactions”.
Expected result: One transaction representing your tier enrollment, plus your remaining USDC.e balance. That public, audit-grade record is the proof that you joined — visible to you, your accountant, your auditor, anyone you point at it.
Common issues on the wallet path
- The bridge says “pending” for several minutes. That is normal — cross-chain finality takes time by design. If still pending after 30 minutes for a major chain, check the bridge’s own status page or contact its support.
- USDC.e is not showing in MetaMask after bridging. Click MetaMask’s “Import token” option and paste the COTI V2 USDC.e contract address from the bridge’s confirmation page. MetaMask does not auto-detect every token.
- “Insufficient gas” on the bridge. Bridge gas is paid in your source chain’s native token, not in USDC. You need a small amount of source-chain native (e.g., ETH on Ethereum) for the bridge transaction itself.
- Wrong network selected. When checking your USDC.e balance after bridging, make sure MetaMask is on “COTI V2 Helium mainnet” (chain ID
2632500) — not Ethereum, not the source chain. - Agent does not have a “Join SAIHM” capability yet. Most modern agents respond to natural-language financial commands. If yours does not, see /appendix/ai-agents for the current list of supporting agents.
For technical users
The full step-by-step onboarding, including the gasless email option and direct USDC.e payment, is at /join.
Production client: @saihm/mcp-server-pro (Apache-2.0). Rates and tiers on Pricing.
Get help
Stuck? Email ops@saihm.coti.global with:
- Your wallet address (the
0x…string — safe to share). - Which step the walkthrough stopped working at.
- Any error messages, exactly as displayed.
Never share your recovery phrase or private key — SAIHM will never ask for them, and neither will any legitimate support channel.
Common questions
Do I need a wallet or a card to try SAIHM?
No. Running npx -y @saihm/mcp-server-pro free-join activates a free, one-time lifetime memory allowance. It prints a short code and a link; you open the link, enter the code and approve with a GitHub account. There is no wallet to fund, no card to enter and nothing to bridge.
How do I add SAIHM to my AI client?
Paste the mcpServers config block into your MCP client's configuration. Any MCP-capable host works, including Claude Code, Claude Desktop, Cursor and Continue. Adding SAIHM is a configuration change rather than a code change, because your agent already speaks the Model Context Protocol.
What does saying “Join SAIHM” actually do?
Self-join is on by default, so you can skip the command line entirely: add SAIHM to your client and tell your agent “Join SAIHM”. It generates a sovereign memory key on your own device and walks you through the same one-time GitHub sign-in.
What do I need to back up?
The key file that free-join names. It is the only key to your memory: cells are sealed on your device before they leave it, so the operator stores ciphertext it cannot open and cannot recover your memory for you if the key is lost.
How do I pay once I outgrow the free allowance?
On the same key, with nothing reinstalled or migrated. Paid tiers settle by card through Stripe, by card and M-PESA through Paystack in Africa, or in USDC.e on COTI V2 mainnet. If you hold no COTI for gas, a gasless signed-authorization by email covers it.